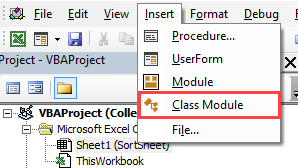
When you insert modules into the Visual Basic Editor (VBE) in order to enter your code, you may have noticed that you can also insert what is called a ‘Class Module’.

The class modules work in a very different way to the ordinary modules in that they facilitate creating a Component Object Model (COM) which can then be used within your normal VBA code
Effectively, you create an object which works in the same way as a built in Excel object such as ‘Worksheets’. In the Worksheets Object, you have a number of properties and methods which allow you to get the number of worksheets within a workbook or each individual name of a worksheet, or numerous other information
When you create a new Object in this way, you are creating a building block which can be used anywhere within VBA. The Object has a number of properties and methods that can be accessed by your VBA code from anywhere within the workbook without having to keep re-writing the code over again.
As well as referring to your new object from a standard VBA module, you can also use it in the code behind a UserForm that is part of your custom application
You can also use it where you have placed Active X controls onto a worksheet, such as a command button or a drop down. These controls all use VBA, and your new object can easily be incorporated into the event code for these controls.
You can also turn your object into an Excel add-in. Your object will automatically be available to other users who have that add-in loaded. This adds your own multi-tier architecture to your Excel application
Excel is a multi-tiered application. There is the client services layer, which drives the actual worksheet window that that the user is familiar with. The Excel object model is the next layer underneath. Press F2 in a VBA module and you will be able to see the huge number of objects and members of those objects that are the engine of Excel. Note that your new object will also be displayed here.
Finally, underneath all of this, you have the data services layer which holds all the data that you have entered into the worksheets and cells. Excel accesses this using the Excel Object model.
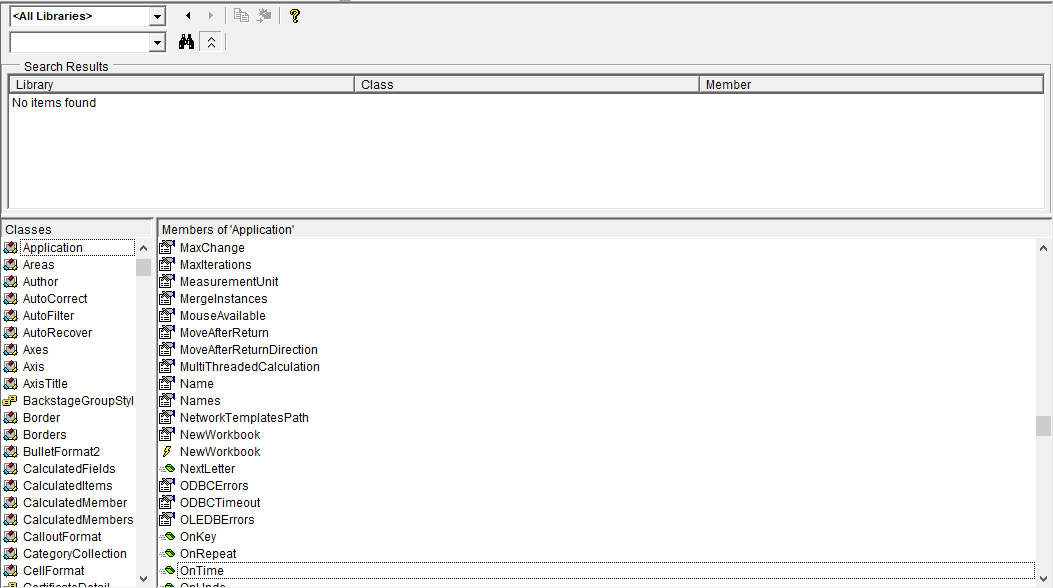
Creating a Class Module allows you to extend the Excel Object Module with your own custom objects and members
This article explains to you how you to create a simple hierarchy of objects using Class Modules.
Select Insert | Class Module from the VBE (Visual Basic Editor) menu. The new Class Module will automatically be called ‘Class 1’, but this needs to be changed immediately to the name that you are going to use for your object
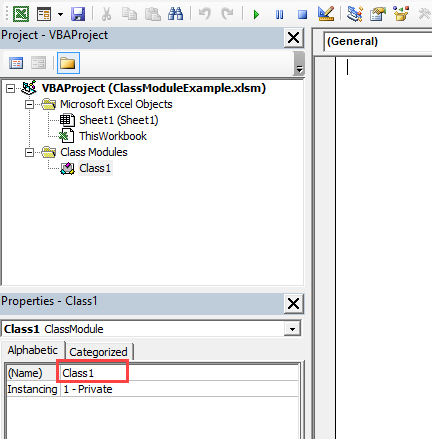
You change the name in the Properties window where the arrow is pointing. You simply type in your new name, and this will change in the Class Modules collection
If the Properties window is not visible, then select View | Properties on the VBE menu or press F4
Call your new class module ‘MyItem’ and double click the name in the tree-view in the Project Explorer to display the code window for it.
This example will create a top-level object called ‘MyItems’ with a member object below it called ‘MyItem’ which will hold the individual data for each item. Once created it will work in the same way as a built in Excel Object. For example, there is an object called ‘Worksheets’ which is a collection of each worksheet within your workbook. There is also an object called ‘Sheet’ which represents each individual worksheet within your workbook, and holds all the properties and methods for each worksheet. This object relates to the ‘Worksheets’ collection object.
You can iterate through the ‘Worksheets’ collection, viewing each ‘Sheet’ in turn. In the same way you will be able to iterate through the ‘MyItems’ collection viewing the properties that you created in the ‘Myitem’ member.
The first thing to do is to create the sub object for the member level which will hold the actual items within the collection of the top-level object. This is the equivalent of the members (e.g. name, visible, count) within the ‘Sheet’ object in Excel. This code is entered into the class module called ‘MyItem’
Class modules have Properties and Methods. Properties are effectively like variables, in that they hold values of data like variables, and Methods are like sub routines or functions.
In the sub object we are going to create two properties for the object – Item and Detail
Initially two string variables need to be declared to hold the values for the properties:
Private mItem As String Private mDetail As String These need to be declared in the Declarations section at the top of the code for the class module so that they can be used in all sub routines throughout the module
They need to be given unique names to make them different from the properties that we are going to create, so an ‘m’ (for member) has been put in front of each name.
The variables are declared as Private so they cannot be seen by anyone using the object. They are working variables for use within the object code and are not there as part of the final object.
The next step is to set up code to give access to the two properties. You do this by means of a Property Let and a Property Get statement for each property. These must be Public otherwise the top-level object will not have any visible properties
Public Property Let Item(vdata As String) mItem = vdata End Property Public Property Get Item () As String Item = mItem End Property Public Property Let Detail (vdata As String) mDetail = vdata End Property Public Property Get Detail () As String Detail = mDetail End Property This code creates the means to read and write values to the two properties (Item and Detail) using the two private variables that were defined in the declarations section of the module.
The ‘vdata’ parameter is used to pass data to the property concerned.
It is important that each property has a ‘Let’ and ‘Get’ statement and that the property name is the same in each case. You could end up with two different properties if miss-spelt – one that you can read from and one that you can write to!
To help with creating this code, you can use Insert | Procedure on the VBE menu to create a code skeleton which will create the initial code for the ‘Get’ and ‘Let’ properties for a given property name
This will display a pop-up window where you type the property name in and select ‘Property’ on the radio buttons:
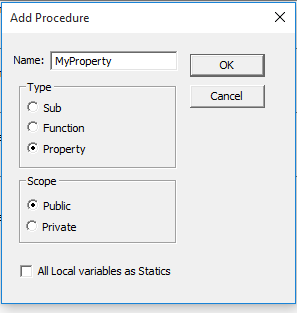
Click ‘OK’ and the skeleton code will be added into the class module:
Public Property Get MyProperty() As Variant End Property Public Property Let MyProperty(ByVal vNewValue As Variant) End Property This prevents any mistakes over names of properties. You simply add your code in between the ‘Public Property’ and ‘End Property’ statements.
You now have an object called ‘MyItem’ which will hold all the data for this exercise.
The next stage is to create a top-level object as a Collection object to give access to the properties that you have set up in the ‘MyItem’ object
Again, you need to define a working object to act as the collection object in the same way that you defined the two string variables in the ‘MyItem’ object.
Private mItems As CollectionAgain, this this has to have a unique name which is why there is an ‘m’ (member object) in front of the name, and it is also declared as ‘Private’ so that it does not appear when the new object is being used
Next, you need to populate the Class_Initialize code. This runs when you first use the object within your code, and it determines what values will be loaded into the object
You can access this sub routine by selecting ‘Class’ in the first drop down and ‘Initialize’ in the second drop down of the module window
Private Sub Class_Initialize() Dim objItem As MyItem Set mItems = New Collection For n = 1 To 3 Set objItem = New MyItem objItem.Item = Worksheets("Sheet1").Range("a" & n).Value objItem.Detail = Worksheets("Sheet1").Range("b" & n).Value mItems.Add objItem Next n End Sub The code sets up an object called ‘objItem’ using the definition of ‘MyItem’ which we built as a class module earlier on.
It then creates a new Collection based on the ‘mItems’ object defined earlier
It iterates through values held on Sheet1 of the workbook and puts them into the properties that we created for the ‘MyItem’ object. Note that when you use ‘objitem’, a drop down appears showing the two properties, exactly as if you were using a built-in Excel object.
The item object is then added into the collection object which now holds all the data in the property values.
The input data does not have to be taken from a worksheet. It could be static values, or it could come from a connection to a database such as Microsoft Access or SQL Server, or it could come from another worksheet.
You then need to add a public function called ‘Item’
Public Function Item(index As Integer) As MyItem Set Item = mItems.Item(index) End Function This allows you to refer to individual objects within the collection object by their index number. This function provides a ‘mirror’ of what is going on in the ‘mMyItems’ collection in the background.
You will also need to add a property called ‘Count’ so that your code can establish how many ‘MyItem’ objects are in the ‘MyItems’ collection, should you wish to iterate through it.
Public Property Get Count() As Long Count = mItems.Count End Property In this case you only need a ‘Get’ property because it is read-only. It uses the mItems collection because this already has a count property built into it.
You now have an object (MyItems) with a full hierarchy defined by the object ‘MyItem’
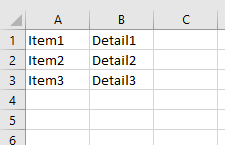
To make the whole thing work, you now need to populate a worksheet (Sheet1) with data so that the Class Initialize routine can collect this into the object
Your spreadsheet should look like this:
You can now use your Collection object (MyItems) within a standard Excel VBA module. Enter the following code:
Sub test_object() Dim MyClass As New MyItems, n As Integer MsgBox MyClass.Count For n = 1 To MyClass.Count MsgBox MyClass.Item(n).Item MsgBox MyClass.Item(n).Detail Next n End Sub This code creates an object called ‘MyClass’ based on the collection object that you created called ‘MyItems’. This fire off the ‘Initialize’ routine that extracts all the data from the worksheet into the object.
It displays the number of items in the collection and then iterates through the collection showing the ‘Item’ text and the ‘Detail’ text. You will notice that when you refer to the ‘MyClass’ object in your code, you will see a list of the two member properties which helps in adding the correct property.
If you change the value of a cell in the input data on the spreadsheet, this will automatically be updated in the collection when you run the above code again, since when you dimension the object, the initialize routine runs and picks up all the new data
If you use the word ‘Static’ instead of ‘Dim’ the initialise routine does not run and the old values are kept, so long as the code is continuously running. If the data on the spreadsheet changes this will not be reflected in the object
Sub Test_Static() Static Myclass As New MyItems, n As Integer For n = 1 To Myclass.Count MsgBox Myclass.Item(n).Item MsgBox Myclass.Item(n).Detail Next n End Sub As you have seen, creating a hierarchy of class modules to use as an object is quite a complicated business, even for a structure as simple as the example provided here. The scope for making mistakes is enormous!
However, it does have huge advantages in making your code more elegant and easier to read. It is also easier to share with other Excel applications and developers by turning it into an Add-In.
In this example of how to create an object to hold data, it would be a normal approach to create a multi-dimensional array to hold the multi-column spreadsheet data, and you would write a line of code to update or read each element in the array. This would probably end up being quite messy, and mistakes could easily be made in addressing the various elements.
With your new object, you can simply refer to it and the members that you have created below it to hold the data.
Also, if the data changes in the spreadsheet (or in a linked database if you have used this as a data source within your class module) whenever you use the ‘Dim’ statement the initialize routine will be called and the data will be instantly updated. No need to write code to re-populate your array.
When you write VBA code you use variables all over the place, all with different scopes. Some may only be defined for a particular procedure, some for a particular module, and some may be global variables that can be used all over the application
You can create a class module that will hold a large number of variables, and because it is an object, it can be used anywhere within your code, even on a user form or in an Active X control that you have placed on a worksheet.
The added advantage is that when you refer to your variable object, you will see a list of all the variable names held in the object sorted into ascending order.
To create a repository, you need to insert a new class module. You do this by using Insert | Class Module from the VB Editor menu
Change the name to ‘MyVariables’ using the same methodology as previously discussed in this article.
Enter the following code:
Private mV As Variant Public Property Get Variable1() As Variant Variable1 = mV End Property Public Property Let Variable1(ByVal vNewValue As Variant) mV = vNewValue End Property Public Property Get Variable2() As Variant Variable1 = mV End Property Public Property Let Variable2(ByVal vNewValue As Variant) mV = vNewValue End Property This code sets up ‘Let’ and ‘Get’ properties for two variables (‘Variable1’ and ‘Variable2’). The Let and Get properties are required for each of your variables so that they are read / write
You can use your own names for the variables instead of the sample ones in this code, and you can add further variables, making sure that each new variable has a ‘Let’ and ‘Get’ statement.
The private declaration of the variable ‘mV’ is to create a working variable that is only used within the class module to transfer values.
To use the variable repository, enter the following code into a standard module:
Global VarRepo As New MyVariables Sub TestVariableRepository() MsgBox VarRepo.Variable1 VarRepo.Variable1 = 10 MsgBox VarRepo.Variable1 End Sub This code creates a global instance of your ‘MyVariables’ object that you created. You only need to do this declaration once from anywhere within your code.
The code first displays the value of ‘Variable1’ to show that it is empty.
A value of 10 is assigned to ‘Variable1’ and the new value within the object is then displayed to show that this property now holds this value.
Because the instance of the ‘MyVariables’ object has been defined globally, you can refer to any of the defined variables within the object from anywhere within your code.
This has a huge advantage in that if you want to use your variables anywhere in your code, you only need to define one global variable, and from that instance, all the variables can be freely accessed and modified throughout your code.
So far, the code for the object creation is within your workbook application. However, if you want to be able to share your object with other developers or in other Excel applications of your own, you can turn it into an Add-In
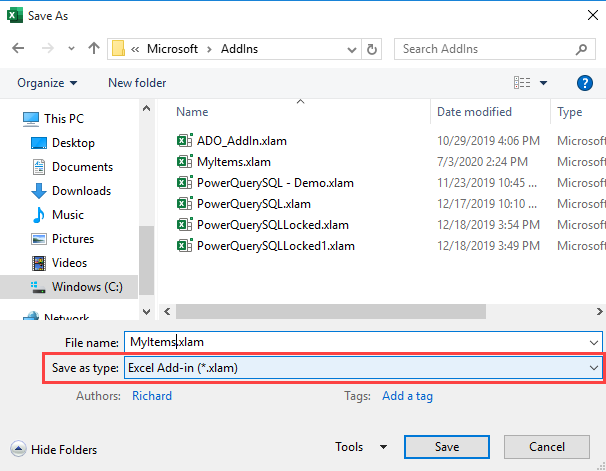
To do this, all that needs to happen is to save the file as an Add-In. Select File | Save As and a browser window will appear
Select the file type as Add-In (.xlam) from the file type drop down and click OK. The file will be saved to the Add-In folder by default, but you can change the location.
You can then incorporate the add-in file into your Excel applications, giving you the flexibility to make use of your new object
To include your new Add-In into Excel, click on File on the Excel ribbon, and then click on Options at the bottom of the left-hand pane
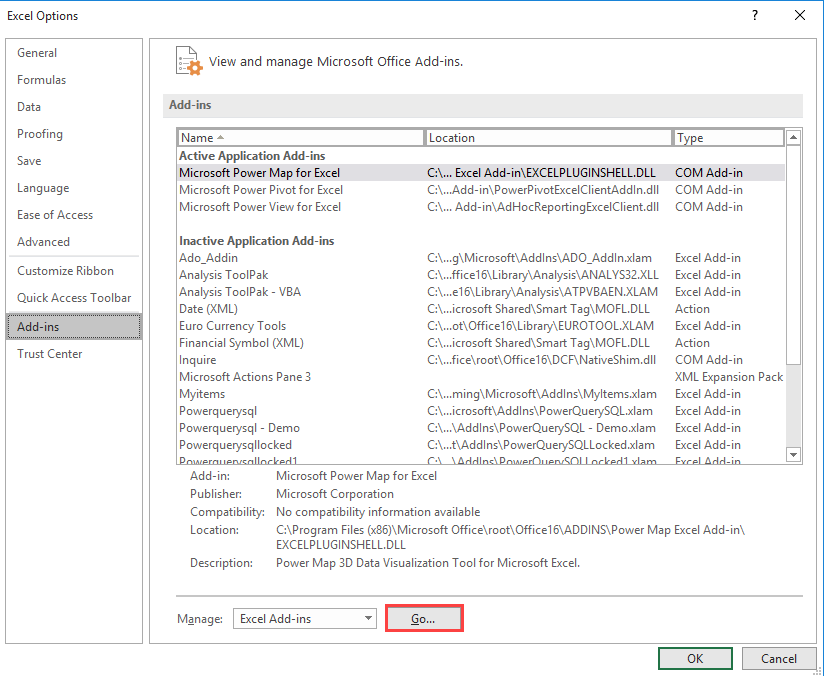
Click on ‘Add-Ins’ in the left-hand pane in the pop-up window that appears. At the bottom of the window is a button marked ‘Go’
Click on this and an ‘Add-In’ pop-up window will appear. Click on ‘Browse’ and then locate your Add-In file. You will then be able to refer to your object in your code.

Easily access all of the code examples found on our site.
Simply navigate to the menu, click, and the code will be inserted directly into your module. .xlam add-in.
(No installation required!)